
With school starting it has definitely been interesting trying to balance everything I want to complete in one day.
 Somethings are more crucial, like dinner, and somethings are less important, like doing dishes. Aside from that, spending a little time to sew and make things special for the kids is hugely gratifying- and I have to admit I am pretty excited about the upcoming kids clothes week challenge.
 I made this little blue and white number for Phia's school colors day. Although her expression might suggest she didn't love it, I think she was just eager to get back to her favorite hobby...
I made this is my usual hap-hazard, improvised manner. The bodice was sized off of a loose fitting button down shirt and then I made the skirt about 5" wider. Here are the pieces you will need to put together this dress:

a. collar x 2
b. sleeves x 2
c. bodice back
d. bodice chest x 2
e. two strips of 3/4" bias to cover the bodice edge
f. skirt x 2

My daughter is usually size 4-5T, so using a large size 5T button down dress shirt, I made a template for the bodice. I measured 3.5" down from the arm pit and decided that that was how long the bodice would be. The skirt was sized to be just a bit wider than the bodice so there wouldn't be too much drape- the back bodice piece I started with was 14.5" wide, so I added 5" to the width. The length is 17", taking into consideration the bottom hem. I made a template using the sleeves from the button down, tapering them to make it a little more feminine, and made the collar based off of a collar pattern from an adult shirt, but made to the approximate length of the neckline once the bodice was assembled. As a note, on all seams I used a zig zag stitch.
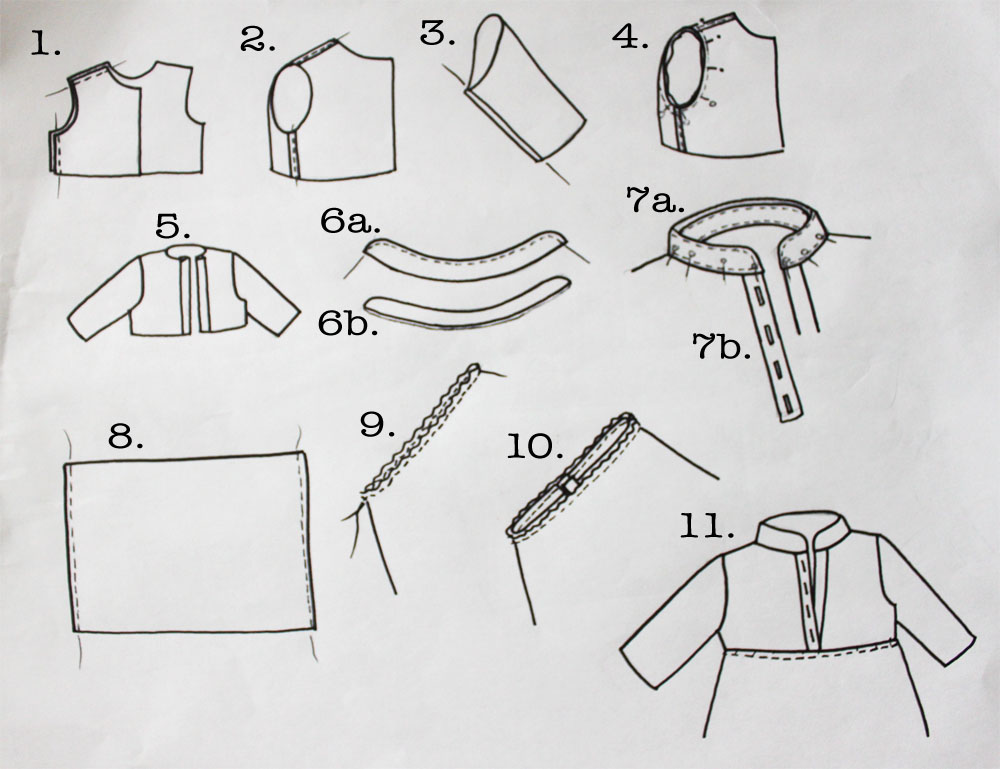
1. Assemble the bodice- with right sides facing, sew together the back and chest bodice.
2. Press and topstitch the side and shoulder seams.
3. Assemble the sleeves.
4. Attach the sleeves to the bodice- flip the sleeve so it is right side out, and starting at the sleeve seam and the side seam on the bodice, pin into place, working up towards the shoulder, and then sew together.
5. Sew the 3/4" bias to the edge of the bodice. I aligned mine with the edge right up to the center fold of the bias.
6a. Assemble the collar- sew along the rounded edge.
6b. Turn it out, press it flat, and then fold over the edge about 1/4".
7a. Starting from the edges of the bodice, pin the collar into place. If the collar is too short (less than 1") then you can make tiny pleats with the back neckline. If it is too long, mark the desired length, adjust it and try again.
7b. Make buttonholes or use snaps on the bias edge. I used four buttons on my dress. Pin the buttonhole bias on top of the bias edge that will have the buttons- you can hand stitch this in place as this is how it will be sewn together in step 10.
8. Assemble the skirt- with right sides facing, sew together your skirt.
9. Gather the top skirt edge with elastic thread in your bobbin, sewing 1/4" from the edge.
10. Attach your skirt to your bodice- with right side facing and starting with the side seams, pin the skirt to the bodice. Gently work it around so that the gathers are as even as possible.
11. Finish the dress- flip the dress right side out, press and topstitch the skirt and bodice seam down. Hem your sleeves and skirt bottom and then attach your buttons. Finished!

3 comments:
Cute dress---luv the buttons and raised waist---even love the attitude on the model. It's obvious the cat wins out on this one. That is one lucky (and big) kittie.
Love, Ma
Adorable! I would love that dress for myself!
This is such a cool dress!! :)
Post a Comment