
Here's my first kcwc project to be finished:
 A reversible vest all fit for Ori. It was a simple little project that came together really quick- I love how motivating instant gratification always feels.
 But, I had to use the power of persuasion to get Ori to like his vest. I might have told my train obsessed son that it is the same vest that a certain railway controller wears.
 And for anyone who would like to put one together, here is a little walk through.
 1. Draft the vest design based off of a button down shirt that fits your child generously. Cut out two left chest pieces, two right chest pieces, two back pieces and two pocket pieces. Make a simple patch pocket, place accordingly, and sew on.
2. With right sides facing, sew the shoulders of each chest piece to the corresponding shoulder of the back piece. Press the seams.
3. With right sides facing, line up the outer vest with the inner vest. Sew around the sleeve holes and, starting three inches in from the side seam, sew along the bottom hem, up around the neck line and back down around to the other bottom hem.
4. Clip the and excess corners, and then flip the vest out so that it is right side in.
5. Press all of the seams.
 6. Match up the side edges (labeled a and b) so that the seams line up perfectly. Sew along the edge to make the side seam. Repeat for the other side edge.
7. Turn out the seam and press so that the only seam left to sew is the bottom hem.
8. To make it reversible I sewed the bottom hem by hand with an inset stitch. Press the bottom edges inward so that they are right sides together with a 1/4 inch fold and then line up accordingly and then sew the two pieces together.
9. Mark and sew on your button holes, and then sew on your buttons to line up properly.
Snip and strings and press.
 A reversible vest all fit for Ori. It was a simple little project that came together really quick- I love how motivating instant gratification always feels.
 But, I had to use the power of persuasion to get Ori to like his vest. I might have told my train obsessed son that it is the same vest that a certain railway controller wears.
 And for anyone who would like to put one together, here is a little walk through.
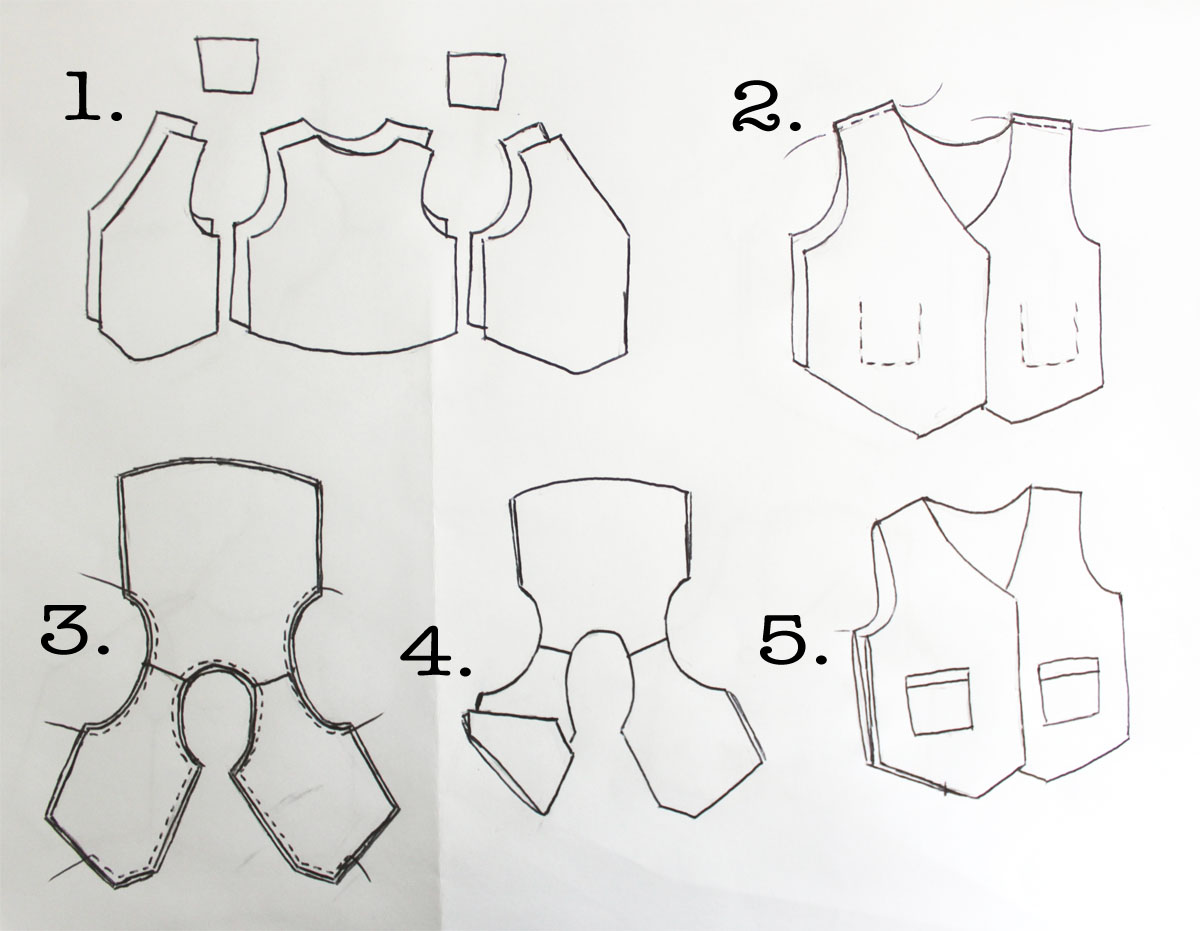 1. Draft the vest design based off of a button down shirt that fits your child generously. Cut out two left chest pieces, two right chest pieces, two back pieces and two pocket pieces. Make a simple patch pocket, place accordingly, and sew on.
2. With right sides facing, sew the shoulders of each chest piece to the corresponding shoulder of the back piece. Press the seams.
3. With right sides facing, line up the outer vest with the inner vest. Sew around the sleeve holes and, starting three inches in from the side seam, sew along the bottom hem, up around the neck line and back down around to the other bottom hem.
4. Clip the and excess corners, and then flip the vest out so that it is right side in.
5. Press all of the seams.
 6. Match up the side edges (labeled a and b) so that the seams line up perfectly. Sew along the edge to make the side seam. Repeat for the other side edge.
7. Turn out the seam and press so that the only seam left to sew is the bottom hem.
8. To make it reversible I sewed the bottom hem by hand with an inset stitch. Press the bottom edges inward so that they are right sides together with a 1/4 inch fold and then line up accordingly and then sew the two pieces together.
9. Mark and sew on your button holes, and then sew on your buttons to line up properly.
Snip and strings and press.

6 comments:
Thanks so much for the tutorial! I can't wait to try this!
I LOVE your sewing! So so great and thanks for the tutorial. I was going to ask hehe. I really like the buttons your chose here too.
SUCH a cute vest on your little guy! pinning this tutorial for later - thank you!
too darn cute. love this. :)
Such a great vest! Can't wait to try it! Thanks so much.
What a team--Thomas and Ori. How cute! Luv that haircut!
Love, Ma
Post a Comment